Saturday, August 23, 2014

Kodak Soft Focus Portrait Lens 16" (405mm) f/4.5

After searching for what seemed forever, for a reasonably priced 16" Kodak Portrait lens in good condition, I got me one. I am overly exited to blog about this one. So much so that I'm doing it even though I have not been able to shoot with it yet. Just got back from vacation and I need to mix some chemicals before I can shoot anything.

The lens is too big to fit a Deardorff lens board, if you use the flange that came with it, so I got Zbyszek to make me a custom lens board. He sells lens boards and adapters on eBay and he can make any size lens board you need, great quality. I had him make the hole the size of the threads on the lens (126mm), this way I was able to screw the lens onto the wooden lens board without using the huge flange. It was challenging to get it on - it's a tight fit. I had to lightly sand the hole to get it started - be careful, you don't want to sand it too much and risk it being too loose. I used a strap wrench and big table-top vise. It's on pretty tight, at least three or four threads deep.

Aperture exposed, and in front of lens
The Kodak 16" Portrait lens is a rare soft focus lens. It has the unusual feature of having the iris or aperture in front of the lenses. Not very common, usually the iris or aperture is between lenses and definitely behind the most forward lens. This 405mm f/4.5 lens is short and fat. It weighs just shy of 4 lb. with a 5" diameter.  So far the Deardorff seems to handle the weight fine. 


Kodak 305mm f/4.8 comes with shutter
You would likely find a Kodak 305mm f/4.8 portrait lens before one of these. The 305mm comes mounted on a shutter, while the 405mm is too big and has no shutter. I don't mind shutterless barrel lenses. I use barrel lenses for my wet plate portraits exclusively. Besides, I needed a portrait lens that would work with my 8x10 as well as my 11x14 and the Kodak 405mm f/4.5 just might fit the bill. We'll see.

I'll get back to you after I shoot some portraits with this lens
 - I'm getting ready to shoot 11x14 wet plates - waiting on the guys from Lund to send me my 11x14 silver tank. I'm exited!

Kodak portrait lens mounted on an 8x10 Deardorff
Serial number RM160 (1953) L (Lumenized)

Many thanks to Brian Wallen for his help finding data on this lens, click on his name to go to his website. According to serial number data my Kodak Portrait Lens, 16" (405mm) f/4.5 was made in 1953. Below is a page from Kodak's 1952 - Professional Handbook / Cameras.

Click on page to enlarge

Visit my other blogs:

http://sfvintagephoto.blogspot.com
http://oldlensesnew.blogspot.com


Check my eBay listings, you might find something you need: 

Saturday, July 19, 2014

Using a Goerz 304mm f/5 Missile Tracking lens for Wet Plate

The Goerz lens I used for the two photos below was designed for a missile tracking system used back toward the beginning of the Cold War - it covers 11x14 and beyond but only has a small center area of sharpness. I couldn't find much information on the camera it came from, except for a website from a private collector in Australia - http://camerasdownunder.com

The Goerz lens came from a rocket tracking camera like this one


Thanks to Holger for letting me use his photo. The 304mm Goerz lens works great as a portrait lens, and gives a beautiful soft bokeh anywhere beyond the sweet spot in the center.


C. P. Goerz E. F. 304mm f/5 on Deardorff 4x4 lens board by Zbyszek
What's incredible about this lens is its huge coverage, albeit way out of focus with radial or spherical aberrations, anywhere beyond the sweet-spot. I've shot on 11x14 paper with this lens and the results were interesting, see my other blog post: blogspot/more-tests-more-photos.html

Lily, 8x10 Shot with Goerz lens
Daniel, 8x10 Shot with 304mm f/5 Goerz lens
I'm happy with the results I'm getting on 8x10. I use lens shift and lower the lens to move the sweet spot around eye level. I focus on the eyes and the rest of the plate becomes a creamy blur the further away from the sweet-spot.


Thursday, June 26, 2014

Good Bellows are Hard to Find, Black or RED

If you're like me and you are new to wet plate photography - you'll need to get a camera - I opted to get a couple of used vintage large format cameras. Older used cameras are cheaper then new cameras, and they have a certain old-world charm that I love. 
Black 8x10 tokyophoto bellows

Many of the older cameras have worn-out deteriorated bellows. I had one that came apart in my hands, practically crumbled before my eyes. 

I've had the opportunity to search for well made bellows and had the good fortune to find a seller in Japan that makes a great bellows, in my opinion. On ebay the seller ID is tokyophoto.
Very well made - Did I tell you it came with frames installed


Frame already installed - a wonderful thing!
The bellows arrived promptly and seemed strong.  It came with wooden frames already attached, which others sellers don't usually supply. Trust me when I say having the wooden frames already attached to the bellows is wonderful. 

I ordered a traditional black bellows. On their eBay listing the description reads "made out of a nylon rip-stop material" that they claim to be "coated with several layers of proprietary waterproof fabric similar to Gore Tex." Like they claim - the fabric is tough yet pliable and lightweight. 

I thought it would be difficult to remove the old bellows and install new ones, I 
didn't know what to expect. I was surprised and impressed with the Deardorff design. Deardorff bellows are glued and stapled to wooden frames. The frames are pre-drilled, and all you have to do is screw them onto the front and rear standard - many vintage large format cameras have their bellows directly glued to the front and rear standard which means you have to, pretty much, destroy the bellows when you remove them - unless you are meticulous and careful and use some solvent to remove the glue.

I removed 8 screws on the front standard and 12 on the rear standard and the bellows slipped out nicely. I was happy. I placed the new bellows in position and the fit was perfect - not too tight - just right. After screwing the 20 screws back in I was happier. The look is great, and the bellows stay firm and don't sag at all. tokyophoto has come up with the right materials and design to create a bellows with the right amount of stiffness to stay put.


Leather bellows might look better to some - but these bellows, made out of modern materials, look mighty good to me.

After having the black tokyophoto bellows installed on my 8x10 Deardorff, and using the camera for three months I contacted tokyophoto and asked if they could make me a red bellows. Joy, from tokyophoto told me it would take some time for them to find the right red fabric - I told her to take her time and see what she could do. I figured I could use the black bellows on another camera I have. What can I tell you, I like RED.

Red tokyophoto bellows installed on my Deardorff 8x10
Bellows will not sag at any extension


Shortly afterwards Joy contacted me and told me that they had experimented with a few different red fabrics unsuccessfully, but that they had finally come up with a combination that would work.

What a great bellows. Red, just like I like it (it's always the small stuff that makes you happy). It turns out that the red bellows is just as good as the black version.

Minimum extension

It's a little thicker, but compresses adequately and allows the camera to be folded with just a hair more force. Just like the black one they sell, this one doesn't sag at all. Tilt, shift and swing can be done quite effortlessly. I have to admit I don't use much of these adjustments, because I mostly do portraits, but if I need movements I can accomplish them easily with my red bellows.

BTW, Deardorff did make red leather bellows for their 8x10 off and on from 1923 -1938, I believe. Google it and see if I'm right. They are very rare nowadays. My Deardorff was made after 1950, so it should have a black bellows - I'm no purist, and I like red. In conclusion - I give tokyophoto five stars ✭✭✭✭✭ great service, great product and just the right color, at least for my taste. I liked it so much I even got one for my 5x7 below.

8x10 at full extension
RED bellows on my 5x7


Visit my other blogs:

http://sfvintagephoto.blogspot.com
http://oldlensesnew.blogspot.com

Check my eBay listings, you might find something you need:

http://www.ebay.com/sch/kubanakan/m.html


Monday, June 16, 2014

Wet Plates

Asa, 5x7 Wet Plate Collodion on Aluminum with Carl Meyer 12" f/4.5 lens
After experimenting on my own, with mixing chemicals for wet plates, and after assisting Peter DaSilva on his own wet plate project, I managed to start cranking out clean collodion alumitypes.

It hasn't been as difficult as it might seem. To recap, I had issues with lens flares and lighting problems associated with un-coated lenses. Chemical issues where not as bad as I've heard, rather a common developer issue. Veiling or clouding of the image from overdeveloping.  It was the same issue Peter and I worked out together, in which we came up with the mantra: Over-expose, under-develop.

If you expose correctly, you should start to see an image less than ten seconds from the moment you pour fresh developer. At ten seconds you should begin to stop developing and rinse your plate in water. It will continue to develop for a little as you rinse.

If you don't see an image before ten seconds you are under-exposing your plate and need more light. For these images I used two Norman LH4000 strobes at full power and a reflector. Approximately eight thousand watt-seconds. You can read more about the Norman strobes in an older post.

Hatuey, 5x7 Wet Plate Collodion on Aluminum with Carl Meyer 12" f/4.5 lens
The only other problem I had was crap in the chemicals - everything has to be periodically filtered through a coffee filter. The silver nitrate has to be maintained and filtered, as well as the developer, and even the salted collodion can get full of dried specs of collodion that need to be filtered out. Keep all your plate holders, tools, bottles, and beakers clean.

Ajeya, 8x10

Miriam, 8x10 shot with Carl Meyer 12" f/4.5 lens


Check my eBay listings, you might find something you need: 

Tuesday, February 18, 2014

More Tests, More Photos

I had so many issues when I tried to shoot with wet plate collodion that I decided to work-out any equipment issues with Harman Positive Paper.  It's hard to tell whether the problems I was having were because of the complicated collodion process or if they had something to do with the equipment.

With the Harman paper  I have a professionally produced product that I know works well. I tested the paper in another post below and it worked well with my 8x10 Deardorff with the 5x7 back and a Schneider-Kreuznach 210mm f/5.6 lens.

I also wanted a chance to go through my older shutter-less lenses to decide which ones to keep, AND I wanted to shoot with my newly acquired Vageeswari 11x14 camera and the newly mounted Wollensak Vitax Portrait lens. I ordered some 8x10 and 11x14 Harman Direct Positive paper and proceeded to have some fun.

I setup a studio in my garage with flash and backdrop. I used two massive 4000Ws and one 2000Ws Norman flash units. Remember this paper is ISO 3 - very slow.

I ran into some issues that took me some time to troubleshoot. Thankfully I had a bunch of family members come over to sit patiently and pose for me.

The biggest issue I had was excessive lens flare from the various uncoated vintage lenses I was using. I couldn't tell with the modeling lights, but the powerful flashes were blowing away the lenses and scattering light inside them to the point of creating nothing but ghost images with no contrast. More specifically it was the backlight causing all the chaos. Once I flagged the backlight it was ON.

Hatuey with crazy lens flare on Carl Meyer non-coated lens
It wasn't obvious at first. I started shooting with an old Carl Meyer 12" (305mm) f/4.5 lens. The photos came out all washed up with no contrast mostly light gray and white. I thought it might be due to light leaks in the film holders or with the Packard shutter. I decided to use the lens I shot the "les Mis" photos, which had given great results. It worked. I was able to make nice contrasty images with the newer coated Schneider-Kreuznach 210mm f/5.6 lens.
Carl Meyer 305mm f/4.5 on 8x10 Deardorff

I switched back to the Carl Meyer lens. I took a photo of my son and WHAM - no contrast, gray ghostly image. See above photo. Everything else was constant, the film holder the camera, it couldn't be light leaks. It had to be the lens. I thought about it and it hit me.

Coated lenses, like the 210mm Schneider, don't have as bad a flare problem as non-coated lenses. I turned off the backlight and BINGO, wonderful photo with great contrast and deep blacks on the Carl Meyer. See photo below.

Hatuey, Carl Meyer lens, No back light, no flare
I also learned that the developer doesn't last long when your shooting 11x14. I used Clayton P20 paper developer. I diluted around 13 to 1. Signs of weak developer are gray blacks and no contrast. Once the photos start to take longer than 3.5 minutes to get deep blacks, it's time to remix some developer. Remember, this is all new to me, I'm discovering most of these issues on my own.

Here are more photos from the two day photo shoot:

Nicole, shot with the Schneider 210mm lens and full backlight
Nicole helped me out, and learned alongside me. She developed a few of the photos in the two days we shot these. She is also quite photogenic. 

Greg shot with the Schneider 210mm lens

Cedric, weak developer, low contrast
Andy, Rose and Dhaisha shot with a missile tracking lens - I'm going to play with this Goerz lens a little more.
The Goerz lens I used for the above photo was designed for a missile tracking system. I had not figured out the flare issue when I shot this photo, so I didn't use it for any other photos that day. I'll have to shoot more photos with this one to see if it works as a portrait lens. Looks like it's a bit on the "low contrast" end of the spectrum, although it might also be the flare issue.

Andres and Nicole

Granddaughter and daughter

Shot with the 11x14 Vageeswari and the 6 lb. Vitax lens


Wednesday, February 5, 2014

Mounting a Packard Shutter on a Six Pound Wollensak Lens (Part 2)

Completed flange, cemented onto Packard shutter

The cardboard flange was great fun to make. The flange is nice and snug, but it doesn't take much effort to install or remove. The multiple layers of glued cardboard are strong enough to hold the whole thing together.  I used 1/32" thick cardboard from an art supply store.

Make sure you work with the natural bend. Cut two strips an inch and a half tall and a little longer than the diameter of the lens barrel. I wrap the first strip of cardboard around the lens barrel loosely then cut at an angle. I use a small piece of masking tape to join at the angle cut.

After measuring I cut it diagonally


You need at least two of these

I take the remaining strip and fit it into the inside diameter of the first strip then cut at an angle. I glue both of these with the angle cut at opposite sides. I use white wood glue, like Elmer's.

After drying overnight the bottom half inch is cut every 3/16" or so; fold as a flange. At this point you need to cut three square pieces of cardboard the size of the Packard shutter. In the center of the first one cut a hole the size of the ID of the cylinder you made.
Folded  3/16" cuts as flange

Apply glue to the bottom of the folds on the cylinder and glue to the first square piece - center cylinder on hole.

On the second square cut a hole the diameter of the cylinder plus the folds. (half inch more than the OD of cylinder).

Glue the second square piece over the top. On the third square cut the center hole the outside diameter of the cylinder. Apply glue and pressure - this one will be glued on top of the folds - like a sandwich.

Shutter and six pound Wollensak Vitax lens side by side
Recap, layers from top to bottom: top square, followed by folds and center square, then bottom square. They should be all glued together, make sure to apply pressure and let it all dry overnight.

The next day after drying, spray it with flat black paint.

Now apply rubber cement to shutter and to flange, join and apply pressure till dry. Packard shutters usually have a layer of felt that needs to be removed before applying glue.

Last thing, I applied the cork strip to the ID of the flange. Done. To install this combo on camera: first install lens from front as usual, then from the back, through the bellows, install the shutter with flange. Go shoot some photos... oh, yeah - you have to figure out what to do with the hose to actuate the shutter. I'll let you figure it out.

All done - shutter mounted on lens
Check my eBay listings, you might find something you need: 


Thursday, January 30, 2014

Mounting a Packard Shutter on a Six Pound Wollensak Lens (Part 1)

Vageeswari 11x14 with Goerz lens
I'm getting ready to shoot on an 11x14 Vageeswari I purchased from Filip Habart from the Czech Republic.  The Vageeswari, made in India, was originally a landscape 8.5x15" and Filip modified it, by replacing the rear standard and adding new bellows and a few other items, into an 11x14. Filip also sells on eBay, check what he's selling here. I highly recommend him.

I'm mounting a six pound Wollensak Vitax lens to this camera. The Vitax does not have a shutter. The issue is that the shutter is too big for the lens board. I won't be able to mount the Packard shutter to the rear of the lens board.

Six pound Vitax

My solution is to create a flange from cardboard and glue, to mount the shutter on the back of the lens, therefore placing the shutter far enough back into the bellows and away from the small lens board. The flange will be glued to the Packard shutter and the whole thing will hang from the lens.

You can see, in the picture of the Vitax on the left, that there is a little over an inch of barrel extending behind the brass mounting flange on the lens. This is where it will all hang.

I think it will be strong enough due to multiple layers of cardboard and glue. I've made leather lens caps this way before, and they are quite strong. Besides, the shutters isn't too heavy.

My crude drawing of the cardboard mounting flange
On the inside diameter of the flange I'll glue a thin strip of cork to make it a tight fit and prevent the shutter from sliding off the lens barrel too easily.

I've seen other photographers mount their Packards, much the same way, but on the front of the lens, this looks too funky to me. I'd rather not see the ugly shutter hanging in front of this beautiful camera. I'm sticking it on the inside where no one can see it.

I should be getting my lens boards from Jorge Moreno today or tomorrow. He makes lens boards, among other camera stuff, and he has made a few lens boards for me. Click on his name to see what he's selling on eBay.


So the lens, with lens board, is first mounted on the front of the camera. Then I remove the 11x14 back and install the shutter/flange from the back of the camera onto the lens barrel. Plug the air hoses in and we're ready to shoot.

In Part 2 of this saga I'll try to show how I make this cardboard flange.

Check my eBay listings, you might find something you need: 


Monday, January 27, 2014

Exposure & Flash Test on Harman Positive Paper

Norman 40/40 power packs
I managed to get some used Norman 40/40 flash units at a great price from eBay. Seems a few photo-studios run by Sears went out of business and all their equipment ended up on the market at the same time.

You might still be able to get a Norman 40/40 and some flash heads at very reasonable prices. I think the 40/40 used to sell for well over $1000 when new. You can find them for around $75 on eBay.

Les Misérables - Schneider-K 210mm f/5.6

I decided to try some Harman direct positive paper which is about as light sensitive as collodion plates. Ilford rates the paper at ISO 3 which comes pretty close. I figure it's cheaper and less hassle, and since it comes in 5x7 sheets I can shoot on my Deardorff, which has an appropriate spring back. It will also allow me to take my time developing, no hurry to get it done before the collodion dries.

This is POSITIVE paper, this means no negative. Just stick the paper into a film holder and expose in a camera. Ilford also sells this paper in a kit with a pinhole camera. This paper is truly well suited for pinhole cameras.

My daughter was watching Les Misérables, I asked if she would get some white powder on her face and look the part of a French woman of the streets from that era and she agreed. After some rouge, lipstick and eye-shadow, oh, and white powder, we were ready for the close-up. These were all shot on a Deardorff 8x10 with a 5x7 back. I used a Schneider-Kreuznach Symmar 210mm f/5.6 lens.


I couldn't resist shooting my Brother
LH4000 4KWs
I setup two 40/40 power-packs, each one with a 4000Ws strobe head. You know that means four thousand watts per seconds right?

Wow, the kicker didn't light up much. I had the key-light just slightly off center with nothing illuminating the background - just the bleed from the kicker. I was more concerned with getting an image than finessing the lighting. I had shot two photos that were all black and couldn't figure out the problem. I was relieved to find that the flash sync on the shutter was set to "M." Everything worked fine after setting the sync to "X."  It's all about the small details.

I used iShoot Studio radio wireless flash triggers. One transmitter and two receivers. Got them on eBay for cheap. These allow you to sync as many flash strobe as you want. You just need one receiver for each flash unit.

Vintage looking?

My brother stopped by and I took the opportunity to shoot him as well. I shot him much the same way, straight up - except I turned the kicker on the background and that helped bring the back up a little (lovely blurred bookshelf) 

Next photo shoot I'll tweak the lighting and get a little more creative. I did experiment with some grids, a 5" reflector and a 22" soft dish, with and without grid. I'll plug in all four power packs and use more strobes next time.

I like the Harman direct positive paper, except for the fact that it tends to curl when drying. What a pain in the ass. You can find a million ways to fix the curl on the internet - seems that none of them really work.

You can develop the paper with any conventional paper developer - this is nice. I used Ilford Rapid Fixer. Nothing is cooler than seeing the image appear before your eyes, reminds me of high school photography class, except I never took high school photography. Maybe you did?


Check my eBay listings, you might find something you need: 


Sunday, January 12, 2014

Vintage Lenses & Shutters for Wet Plate Collodion

Wet plate photographers have many choices, when it comes to lenses. You can choose from all the newer, modern multicoated lenses, corrected apochromatic, rectilinear. It goes on and on.  Large format lenses with iris and compound shutters, or vintage 100 year old brass lenses without aperture control or shutter.

I like used lenses because you can get some great deals on fabulous high quality optics - new lenses can be very expensive. I love finding old quirky lenses with that "je ne sais quoi" optical quality. They produce photos with that unmistakable uncoated, crapy low contrast, mediocre vintage look. Just kidding. You'd be surprised how some vintage lenses surpass modern lenses in creating memorable images. It is all subjective. You'd also be surprised to find that some of the old brass lenses are fetching well over a thousand dollars because of renewed interest in wet plate photography.

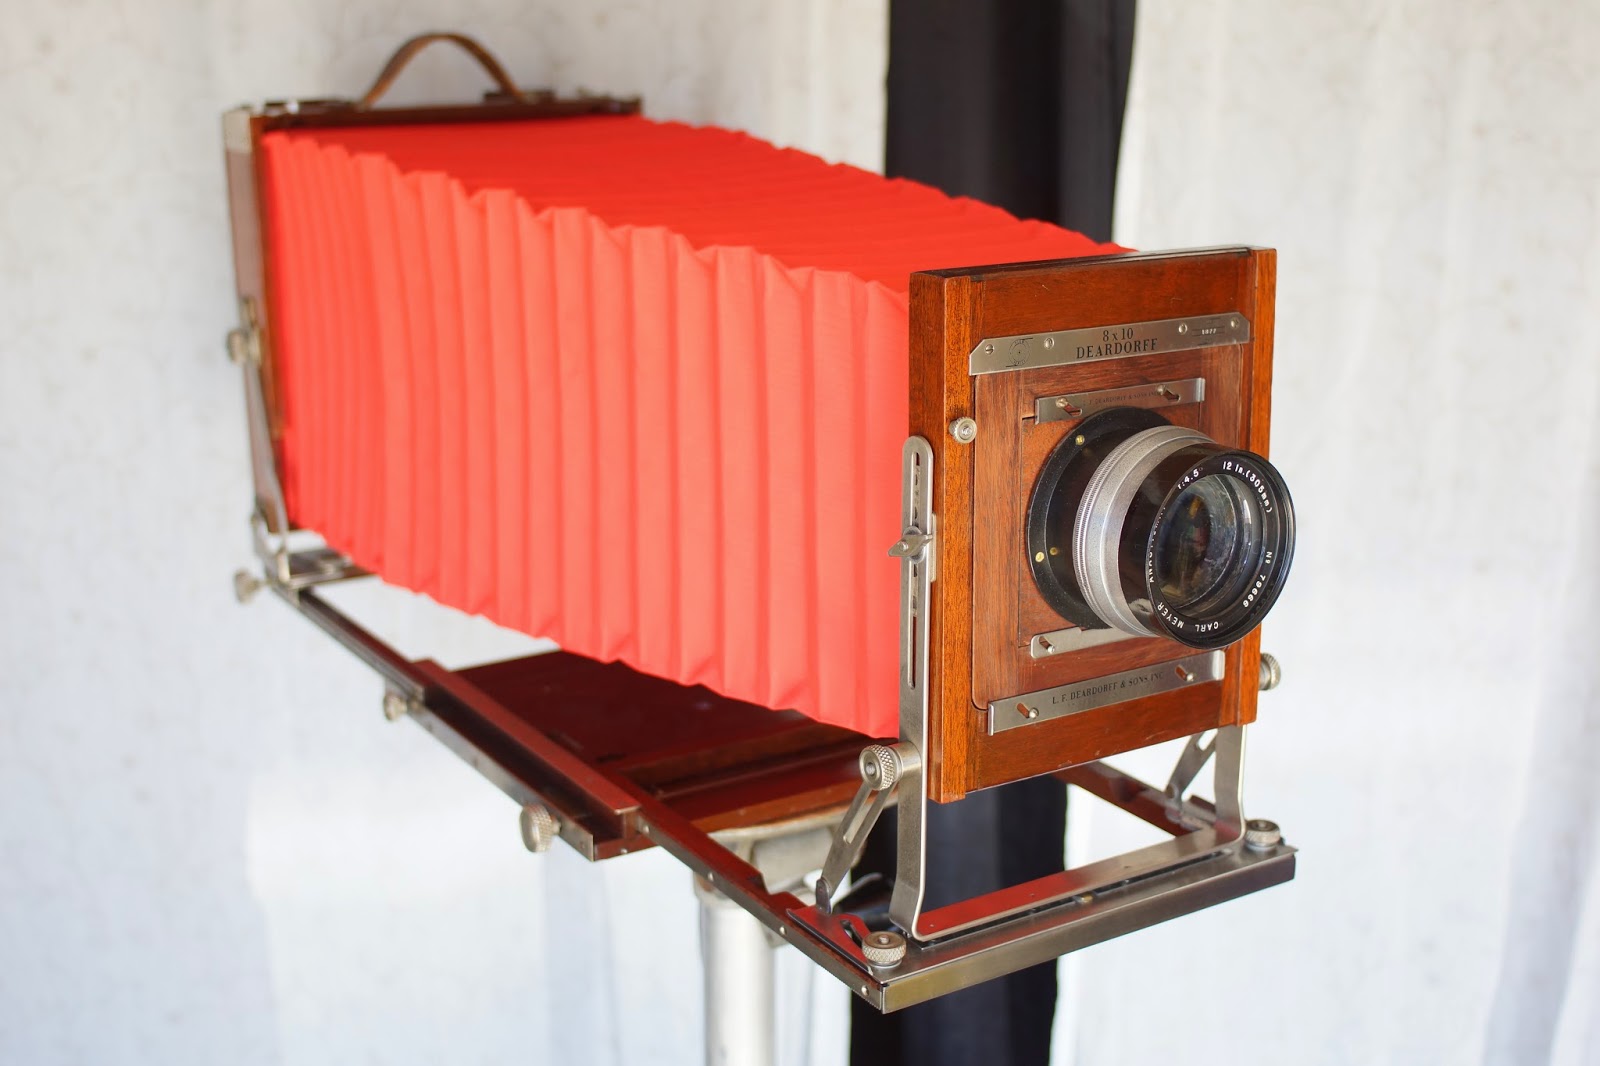
Below is a Deardorff 8x10 field camera with a vintage Carl Meyer 305mm f/4.5 with an iris but absent a shutter. It's a large lens with almost 3 1/2" diameter. How do you control time exposure without a shutter?

My Deardorff V8 8x10 with a Carl Meyer 305mm f/4.5 shutter-less lens

You can always use the lens cap, remove it and replace it for long exposures. Of course, if you need to accurately control the time the plate is exposed to light then you are going to need one of the few shutters available for this type of lens.
The hose connects to the bottom of the piston.
Packard shutters are the most common and are sold on eBay regularly. They are pneumatic, or actuated by an air bulb and a hose. They are installed behind the lens board, between lens and camera.

You can get them with sync capabilities which allows you to use flash. You can get them with a pin that permits what they call "instantaneous" mode, which is an exposure of approximately 1/25 of a second. Without the pin you get "Bulb" mode. Squeeze the bulb and it stays open until you let go of the bulb.

These shutters have been around for a long time as seen in the patent document below, but you can still purchase a brand new one from the Packard Shutter Company.

Click to see larger


Back to lenses. Below is a huge 13.5" Wollensak f/3.8 Vitax lens that I mention in another post. This monster Petzval weighs almost six pounds, with a diameter of nearly four inches and a length of nine inches it's hard to feel safe with this thing hanging on the front of your camera, check my other blog posts to see this Vitax mounted on an Eastman 8x10

Big glass and heavy brass. It has an iris to control aperture but no shutter. The Vitax Portrait lens has an unusual feature that few lenses have, a soft focus knob. This knob controls the separation of two of the glass elements and softly blurs the image just a wee bit. Apparently these are quite sharp when stopped down.  This feature allows the photographer to dial in the "soft focus" for flattering portraits.

Wollensak 13.5" f/3.8 Vitax Soft Focus Portrait Lens is a Petzval lens. Average price today, over $1000.
Seems appropriate to delve into Petzval lenses, since they are sought after by many wet plate photographers.  Back in the time when Daguerreotypes were the rage. Photography was in it's infancy, and exposures were long, very long. An exposure could take 30 minutes, and if you moved during this time the photo could turn out to be just an ugly blur.

There was a need to create a fast lens to cut down exposure time for photography. In 1840 The Society for the Encouragement of Industry in Paris, offered a prize for this elusive lens and the race among designers of optical instruments was off.

It was Joseph Petzval, a professor of mathematics at the University of Vienna who would design the lens that would revolutionize photography.

Petzval revolutionized lens design

The French Society for the Encouragement of Industry did not give Petzval the first prize, although his lens was much faster than any of the other lenses submitted. Petzval's "second prize" winning lens became the dominant portrait lens for nearly a century, while the "first prize" lens would prove to be a commercial failure.


Lens design was mostly trial and error at the time. The Petzval portrait lens, purported to be the first lens designed using mathematics, would change the science of lens design. Petzval lenses were as much as 20 times faster than the lenses in use at the time.

What attracts modern wet plate photographers to Petzval lenses? They are mostly big brass lenses without shutters and many don't have irises. It's the look. These vintage lenses have a unique look. The center can be focused very sharp while the edges have this incredibly swirly soft bokeh. It's a look you can't get from a modern lens.

Lens designers have refined and perfected lenses. They make them so they are crispy-focused all the way to the edges. Lens manufacturers are always trying to remove all imperfections, aberrations and distortions out of modern lenses.  Ask the lomography crowd why they like photography with low-tech, no fidelity and crappy optical quality. It's the look!

Wonderful example of swirly bokeh from a Petzval lens in this picture by Coco Alexander
Check my eBay listings, you might find something you need: